
Wohnwand Hängend
-
Wall Unit CLIF - Living Room Furniture Set - San Remo Oak / Anthracite GreyRegular price $529.99Unit price / perRegular priceSale price $529.99

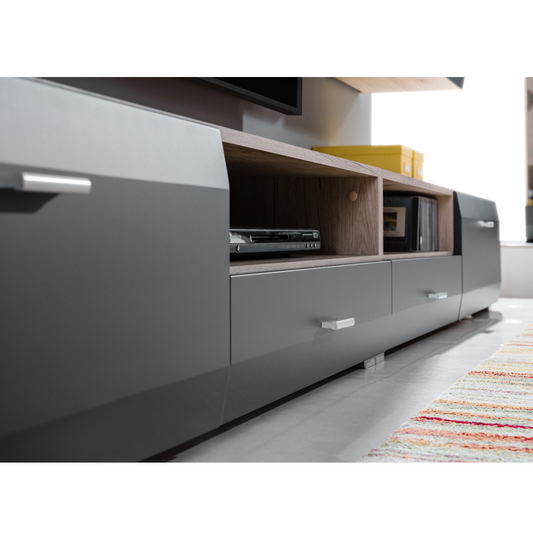
Floating wall unitrefers to a modular combination of cabinet carcasses, floating shelves, and media consoles (lowboards) mounted securely to the wall without direct floor contact. This wall-mounted design creates a floating aesthetic, efficiently utilizes vertical wall space, and makes cleaning underneath the furniture significantly easier.
Amodern floating wall unittypically consists of several individual modules. These include floating TV stands (lowboards), closed wall cabinets, open floating shelves, and wall-mounted display cabinets. For DIYers, choosing afloating wall entertainment centerrequires extra planning and installation effort compared to freestanding furniture, but it rewards you with a clean, uncluttered interior design.
Room Layout and Structural Load Planning
Wall-mounting living room furniture requires a precise analysis of your space. Afloating living room cabinettransfers its entire dead weight plus payload directly onto the wall structure.
Determining Room Dimensions
Before arranging your modules, measure the available wall space precisely. Pay attention to electrical outlets, cable jacks, and light switches. A typicaldesigner floating wall unitrequires a total wall width of 98-7/16 in to 125-31/32 in (250 cm - 320 cm). The clearance between the floating TV console and the floor should ideally be between 5-29/32 in and 7-7/8 in (15 cm - 20 cm). This clearance provides enough room for standard robot vacuums to navigate underneath while keeping the TV stand at an ergonomic viewing height.
A gap of 39-3/8 in to 47-1/4 in (100 cm - 120 cm) is recommended between the TV unit and the floating cabinets above, depending on your TV screen size.
Checking Wall Substrate & Structure
Mounting a floating wall unit onto a porous wall in an older building is like pitching a tent in loose sand—without the right specialized wall anchors, the hardware will tear out under the slightest load.
- Concrete and Solid Brick:Provide the highest load capacity. Standard nylon wall plugs (typically 5/16 in or 3/8 in (8 mm or 10 mm)) combined with matching hex lag screws are sufficient here.
- Aerated Concrete (Autoclaved Aerated Concrete / AAC):Requires specialized aerated concrete anchors that cut deep into the soft substrate to absorb the tensile forces offloating living room cabinets.
- Drywall (Gypsum Board):The most challenging wall type. Standard wall plugs are ineffective here. You must use heavy-duty toggle bolts or hollow-wall metal anchors that expand behind the drywall panel. Alternatively, the mounting rails must be anchored directly into the underlying wall studs (wood or steel studs). Load capacity per cabinet is strictly limited on drywall.
Materials and Surface Finishes in Detail
The choice of material determines not only the weight suspended on the wall, but also the scratch resistance and ease of care of thewall units.
Carcass Material
The cabinet carcass (box) of most models is made of melamine-facedparticle boardwith a thickness of 5/8 in (16 mm). These panels are dimensionally stable and relatively lightweight, which is ideal for wall mounting. On high-quality models, the edges feature ABS edge banding (often 1/64 in (0.5 mm) thick plastic) to protect against impacts and moisture.
Cabinet Fronts and Decors
The door and drawer fronts define the aesthetic. Medium-density fiberboard (MDF) is frequently used here because it routes cleanly and offers smoother surfaces for painted or foil-laminated finishes.
Anyone searching for awhite floating wall unitwill often find fronts in Matte White or High-Gloss White. High-gloss fronts are typically achieved through an acrylic coating or thermoformed PET foil. An example of this material combination is theLAUREN Wall Unit - Living Room Furniture Set - Matte White / Gloss White.
Wood grain finishes are exceptionally popular because they bring warmth into modern spaces. Laminates like Wotan Oak, Sonoma Oak, or Artisan Oak are highly realistic wood reproductions with tactile grain textures. TheMIRANDA Wall Unit with 4 Cabinets - Wotan Oakdemonstrates how a continuous wood laminate structures the wall area.
For industrial or ultra-modern design concepts, bold contrasts are favored. Black and wood combinations, like theMANILA II Wall Unit - Living Room Set - Black Gloss / Artisan Oak, or dark concrete effects like theBLADE Wall Unit - Living Room Set - Matte Black / Sahara 3D, establish strong visual focal points in the room.
Cabinet Hardware: The Core of Floating Installation
The functionality of amodern floating wall unitdepends entirely on the quality of the cabinet hardware installed.
Heavy-Duty Cabinet Hangers and Suspension Rails
Floating wall cabinets are not simply screwed directly into the wall. They rely on a suspension system consisting of mounting rails (wall tracks) and cabinet hanger brackets.
- The steel mounting rail is leveled and anchored horizontally to the wall structure.
- Inside the cabinet carcass, concealed in the upper rear corners behind the back panel, sit the adjustablecabinet hangers.
- The cabinet is hooked directly onto the wall rail via the hanger hooks.
The crucial advantage of this system for DIY installers: cabinet hangers feature internal adjustment screws. Using a Pozidriv screwdriver (PZ2), you can adjust the cabinet's height (typically up to +/- 3/8 in (+/- 10 mm)) and depth (plumb alignment to the wall) after hanging. This allows you to compensate for slight drilling tolerances and ensures yourfloating wall unitis perfectly level.
Hinges and Door Opening Systems
Cabinet doors are equipped with concealedcup hinges(Euro hinges). The standard cup drilling diameter in the door is 1-3/8 in (35 mm), with a typical opening angle of 110°.
For modern handleless designs such as theRENO Wall Unit - Living Room Set - Matte White / Gloss Black,push-to-openmechanisms (touch latches) are used. A mechanical spring-loaded plunger pushes the door open a few inches after a light touch, allowing you to grip the edge.
Important for assembly: Push-to-open hinges donotfeature self-closing or soft-close functionality. They must not be confused withsoft-close dampeners. Soft-close hinges use an integrated hydraulic dampener in the hinge arm to pull the door shut gently and silently over the last few degrees of travel. The two systems are mutually exclusive—a door either uses handleless push-to-open hardware or soft-close hinges with handles.
Flap Stays and Lift-Down Hardware for TV Consoles
Floating TV lowboards often feature drop-down doors that open downward. These utilize flap hinges combined withgas struts(pneumatic gas springs) or mechanical lid stays. The gas strut (rated in Newtons, e.g., 60 N or 80 N) dampens the weight of the front panel during opening, preventing the flap from dropping uncontrollably and tearing out the hinges.
Step-by-Step DIY Installation Guide
Installing aModern Wall Unitrequires a systematic approach. Plan for roughly 4 to 6 hours when installing a 4-piece set like theMIRANDA Wall Unit with 4 Cabinets - Matte White / Wotan Oak. Always work with a helper when mounting units to the wall.
Required Tools
- Hammer drill or rotary hammer (for concrete/masonry)
- Cordless drill/driver with bit set (PH, PZ, Torx)
- Spirit level (at least 32 in (80 cm), preferably 48 in (120 cm)) or cross-line laser level
- Tape measure and pencil
- Rubber mallet (for wooden dowels)
- Screwdriver for hardware fine adjustment
Step 1: Carcass Assembly on the Floor
Assemble all cabinet boxes laying flat on the floor first. Use the providedcam lock fasteners(Minifix) and wooden dowels. Ensure the carcass is square before nailing or screwing down the back panel (typically 1/8 in (3 mm) HDF board). The back panel provides essential structural rigidity to the cabinet box.
Step 2: Marking Drill Holes
Use a cross-line laser level to project a dead-level horizontal line onto the wall. Mark the drill holes for the mounting rails. Remember to account for the distance between the top edge of the cabinet and the internal position of the cabinet hanger hook.
Step 3: Wall Mounting
Drill the holes (typically using a 5/16 in (8 mm) masonry bit), insert wall anchors flush with the wall surface, and screw the mounting rails down securely. Lift and hook the cabinet carcasses onto the rails with a helper. Tighten the safety locking screws on the interior cabinet hangers to prevent accidental unhooking.
Step 4: Aligning Fronts and Door Reveal Gaps
Mount the doors only after the cabinet carcasses are secured to the wall. Adjust the 3-way adjustment screws on the concealed hinges (3D adjustment) to align the doors until reveal gaps between the fronts are uniform all around (typically 1/16 in to 1/8 in (2 mm - 3 mm)).
Cable Management for Floating Media Centers
A primary reason to install a floatingTV wall unitis its sleek, minimal look. Visible cables ruin this clean aesthetic.
- In-Wall Cable Conduit:The cleanest solution. A wide plastic raceway is recessed into the drywall or masonry cavity running from behind the TV down behind the floating media console.
- Surface-Mounted Cable Raceway:A low-profile aluminum or plastic wire channel painted to match the wall color.
- Grommets and Pass-Throughs:During assembly, use a hole saw (typically 2-3/8 in (60 mm) diameter) to drill cable pass-through holes into the top panel or back panel of the lowboard if factory cutouts are not present.
Modular Design Options
The main advantage of afloating wall unitis the flexibility to arrange individual elements. You are not locked into a rigid grid.
- Symmetrical Layout:Creates visual balance and order. Two identical tall or hanging cabinets flank the TV. Perfect for a classicwhite wall unit.
- Asymmetrical Layout:Feels dynamic and contemporary. A long floating TV console is paired with offset floating wall shelves and compact cube cabinets.
- Integrating Display Cabinets:Awall unit with display cabinetbreaks up solid fronts. Glass shelves (often 3/16 in (5 mm) thick) with LED glass-edge lighting add decorative accent lighting.
You can also create deliberate color blocking by pairing light and dark modules, as seen on theMIRANDA Wall Unit with 4 Cabinets - Matte White / Gloss Black. For rooms with limited natural light, a high-gloss white wall unit is recommended, as its reflective surfaces bounce light around the room to make it feel larger. For a moodier, minimalist look, choose amatte black wall unitor ananthracite media center.
Care and Hardware Maintenance
Melamine and MDF surfaces are easy to maintain; a soft, damp cloth is all you need. Avoid harsh chemical cleaners or microfiber cloths on high-gloss fronts, as they can leave microscopic scratches (swirl marks).
Important maintenance tip for DIYers: Re-check the hinges and wall anchor mountings about six months after installation. Wood composite products settle slightly under load. Tighten the adjustment screws on the cup hinges if door reveals are no longer parallel. Also, inspect the mounting plates on gas struts to ensure screws remain tight.
---
FAQ: Frequently Asked Questions About Floating Wall Units
What wall types are suitable for a floating wall unit?
Solid masonry walls made of concrete or solid brick are ideal and handle heavy loads effortlessly. Aerated concrete requires specialized anchors. Drywall walls (gypsum board) require careful planning; you must use heavy-duty hollow-wall toggle anchors or anchor the mounting rails directly into the structural wall studs.
How much weight can a floating living room cabinet hold?
This depends primarily on wall substrate quality and anchor selection. A standard wall cabinet mounted with two heavy-duty suspension points on a solid concrete wall generally supports 55 lbs - 66 lbs (25 kg - 30 kg) easily (including its dead weight). Always consult the manufacturer's load ratings.
What height should I mount a floating TV console?
For comfortable, ergonomic TV viewing from the sofa, the top surface of the lowboard should sit around 17-23/32 in to 21-21/32 in (45 cm - 55 cm) high. This leaves a typical floor clearance of 5-29/32 in to 9-27/32 in (15 cm - 25 cm) below the bottom edge of the cabinet.
What tools do I need for wall mounting?
Essential tools include a hammer drill (or rotary hammer), suitable masonry drill bits (typically 5/16 in (8 mm)), a cordless screwdriver, a long spirit level (at least 32 in (80 cm)), a tape measure, a pencil, and a screwdriver for fine-tuning the hardware settings.
Can I arrange the modules differently than shown in the product picture?
Yes. Because each module (cabinet, shelf, lowboard) utilizes its own independent wall suspension system, you can freely customize the spacing, sequence, and mounting heights of all components to match your room layout.
What is the difference between push-to-open and soft-close hardware?
Push-to-open is a mechanical touch-latch release mechanism designed for handleless doors: pressing the front activates a spring mechanism that pops the door open slightly. Soft-close is an integrated hydraulic dampener within the hinge arm that catches a door (typically equipped with handles) and pulls it closed quietly. These two systems cannot be combined on the same door.
---
Related Categories and Interior Concepts
If you want to expand your room plan or explore specific finishes, browse these matching categories for your living room project:
- Wall Units
- Wood Wall Units
- Designer Wall Units
- TV Entertainment Centers
- Wall Units with Glass Display Cabinets
- High-Gloss White Wall Units
- Matte Black Wall Units
- Anthracite Wall Units
- Modern Wall Units
- Modern Wood Wall Units
- Concrete-Look Wall Units
- High-Gloss Wall Units
- Black Wall Units
- Gray Wall Units
- Oak Wall Units