
Countertop Connectors
Popular Subcategories

-
"Quick" Worktop Connector 5-7/8 inchRegular price $5.05Unit price / perRegular priceSale price $5.05
-
"Quick" Worktop Connector 2-1/2 inchRegular price $4.28Unit price / perRegular priceSale price $4.28
-
M6x5-7/8 inch (150mm) Worktop ConnectorRegular price $0.88Unit price / perRegular priceSale price $0.88
-
M6x3-15/16 inch (100mm) Worktop ConnectorRegular price $0.62Unit price / perRegular priceSale price $0.62

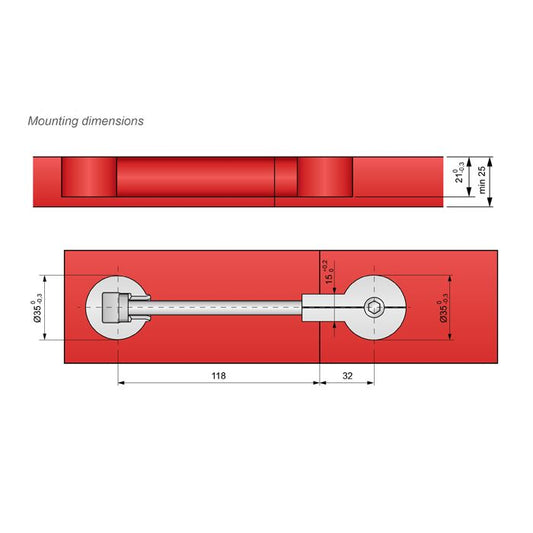

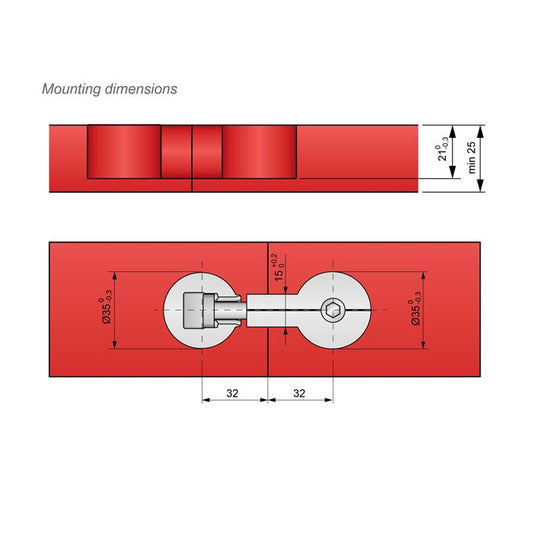

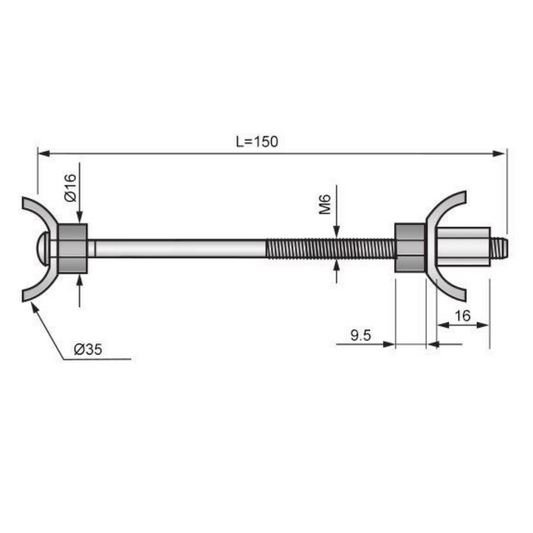

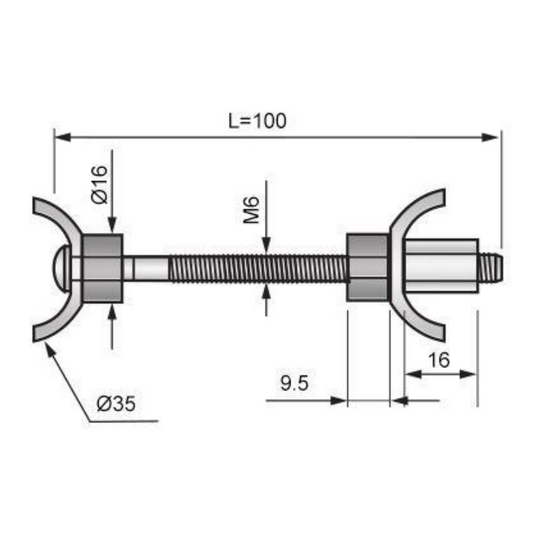
Countertop connectorsare heavy-duty mechanical tensioning fasteners made of galvanized steel, designed to pull two or more kitchen worktops tightly and seamlessly together. They typically consist of a threaded steel bolt, two curved clamping plates (or zinc caps), and a tightening nut or gear mechanism. As the mechanism is tightened, it generates high tensile force, drawing the routed edge profiles perfectly together. In professional kitchen installation, these hardware components are essential for creating strong, invisible, and long-lasting joint connections.
Joining countertops correctly requires precise routing and choosing the right connector regarding length and clamping system. In this technical guide, installers and cabinetmakers will find all relevant details on sizing, routing patterns, and assembly techniques.
Operating Principle and Mechanical Force Transfer
When you join countertops, the seam creates a potential mechanical weak point. Without positive clamping force, temperature expansion, humidity shifts, or heavy loads will cause the joint to separate over time. Heavy-dutycountertop connectorsact like an invisible internal clamp inside the wood, maintaining constant pressing force along the entire joint edge.
The clamping elements are inserted into pre-routed mortises on the underside of the worktop. Tightening the nut or gear reduces the usable bolt length. The curved clamping plates brace firmly against the walls of the 1-3/8 in (35 mm) recessed boreholes, drawing both countertop sections together with immense force. This ensures a flush, level surface while evenly compressing joint sealant (glue or silicone) to block water penetration.
Types of Countertop Connectors
In practice, kitchen installers choose between two primary systems, differing mainly in drive mechanism and installation speed.
Standard Countertop Connectors with Hex Nut
The traditional system features a durable M6 threaded bolt paired with a standard hex nut. To tighten these hidden joint fasteners, a open-end wrench (typically 10 mm) is used. Because space inside the routed mortises on the underside of the board is often tight, tightening is performed in small incremental turns.
This proven design offers maximum reliability and allows fine control over tensioning force. For standard butt joints on 23-5/8 in (600 mm) deep boards, theArbeitsplattenverbinder M6x100mmis the go-to choice. For deeper island tops or angled miter cuts, installers rely on the extendedArbeitsplattenverbinder M6x150mm.
"Quick" Zipbolt & Gear-Driven Countertop Connectors
For significantly faster assembly—especially in tight spaces near sink cutouts or cooktops—gear-driven speed connectors were developed. These specialized joint fasteners feature an integrated right-angle gear head.
Instead of using a side wrench, a hex bit (Allen key) or cordless driver engages the gear from above or a slight angle. The gear turns the rotation 90 degrees directly onto the thread, tensioning the joint in seconds. For short mortise spacings, the"Quick" Arbeitsplattenverbinder, 64mmis ideal, while the"Quick" Arbeitsplattenverbinder, 150mmaccommodates standard router templates.
Lengths and Sizing: Choosing the Right Dimension
Selecting the correct bolt length depends on your router jig template and the geometry of the joint profile.
- 2-1/2 in (64 mm) Length:Short fasteners like the"Quick" Arbeitsplattenverbinder, 64mmare used when boreholes must sit close to the joint line. This is ideal for narrow tops or acute miter joints where longer bolts would interfere with the front edge profile.
- 3-15/16 in (100 mm) Length:The industry standard for kitchen fitting. On a standard 23-5/8 in (600 mm) deep worktop with standard jig spacing, theArbeitsplattenverbinder M6x100mmspans the distance perfectly.
- 5-7/8 in (150 mm) Length:When using wide router jigs or cutting steep miter angles, a standard 4 in bolt falls short. TheArbeitsplattenverbinder M6x150mmor its speed-drive equivalent, the"Quick" Arbeitsplattenverbinder, 150mm, provides the necessary reach. It also offers extra placement flexibility on 35-7/16 in to 47-1/4 in (900 mm to 1200 mm) deep kitchen islands.
Technical Preparation: Router Mortising
To install heavy-dutycountertop connectors, precise recesses must be machined into the underside of the boards using two circular pocket holes connected by a shaft channel.
Tools and Specifications
Use a heavy-duty router (at least 1400 W), a straight router bit, and a countertop jig. Alternatively, circular pockets can be drilled using a Forstner bit.
- Recessed Borehole:The circular pockets for the clamping heads require a standard 1-3/8 in (35 mm) diameter bit.
- Routing Depth:Recess depth depends on board thickness. For a standard 1-1/2 in (38 mm) laminate top, cut the pocket 13/16 in (20 mm) deep. The bolt must align with the vertical center of the board to apply balanced pressure and prevent surface warping.
- Connecting Channel:Route a straight 3/8 in to 1/2 in (10 mm to 12 mm) wide channel between both 1-3/8 in (35 mm) pockets to accommodate the threaded shaft.
Edge Distance
Borehole distance from the joint edge must match your fastener length. For example, using theArbeitsplattenverbinder M6x100mm, the center of each hole sits roughly 1-21/32 in to 1-25/32 in (42 mm to 45 mm) from the edge. For the"Quick" Arbeitsplattenverbinder, 64mm, reduce this spacing to approximately 1 in to 1-3/32 in (25 mm to 28 mm).
Step-by-Step Installation Guide
Assembling the joint is a time-sensitive step that requires quick, precise execution before sealant cures.
- Dry Fit:Align the boards dry and drop in the hardware. Confirm that theArbeitsplattenverbinder M6x150mmor chosen model fits loosely into the pockets and the surface edges sit flush. Wooden biscuits or alignment dowels added to the joint edge help maintain vertical alignment.
- Apply Sealant:To protect the joint from moisture expansion, apply waterproof D3/D4 wood glue or color-matched joint sealant generously to the bare cut edges.
- Insert Connectors:Push the boards together within a few millimeters. Drop in the bolt hardware, ensuring curved washer plates seat firmly against the 1-3/8 in (35 mm) bore walls.
- Snug Tighten:Pre-tighten gently. Use a 10 mm wrench for standard nuts or a cordless driver on low torque for quick-drive models like the"Quick" Arbeitsplattenverbinder, 150mm.
- Align and Fully Tighten:Verify the top surface is perfectly flat and flush. Fully torque the connectors in an alternating pattern. Sealant should squeeze out evenly along the top seam.
- Clean Up:Wipe away excess glue or silicone immediately using an appropriate solvent or scraper before it hardens.
Countertop Bolts vs. Surface Joiner Strips
When searching for joiner strips or T-bars, understanding the technical differences is key.
Concealed draw bolts (such as the products listed here) create a completely hidden joint. Worktops are butt-joined or mitered together, leaving only a hairline seam on top—the professional standard for modern kitchen design.
Surface joiner strips, by contrast, are H-shaped aluminum or plastic transition profiles. Boards are straight-cut without routing and slid into the profile from both sides. The profile lip remains visible on top. While this method requires no routing tools, it creates an exposed ridge that traps grime and disrupts a clean countertop finish.
Special Applications and Troubleshooting
Thin Compact Laminate Tops
Modern kitchens frequently feature ultra-thin HPL or solid core tops measuring just 3/8 in to 1/2 in (10 mm to 12 mm) thick. Standard hardware requiring a 13/16 in (20 mm) rout depth cannot be used here. Specialized low-profilecountertop connectorsare designed for shallow mortises of just 1/4 in to 5/16 in (6 mm to 8 mm).
Corner Miters and L-Shaped Layouts
Joining corner worktops requires precise alignment. Corner joint cuts (mason's miters) require at least two, or ideally three, draw bolts on a 23-5/8 in (600 mm) deep top. Position the frontmost bolt as close as possible to the front postformed edge to prevent gap opening. The compact"Quick" Arbeitsplattenverbinder, 64mmexcels here due to its small footprint.
Common Installation Errors
- Overtightening:Do not apply extreme torque. Excessive force can crush particleboard core material around the 1-3/8 in (35 mm) bore, causing the pocket to blow out.
- Omitting Alignment Biscuits:Never rely on draw bolts alone for height leveling. Always install wood biscuits or splines in the edge slot to keep top surfaces perfectly flush.
- Insufficient Sealing:The most common failure when joining countertops is inadequate glue coverage. Water entering an unsealed joint causes irreversible wood core swelling.
Frequently Asked Questions (FAQ)
How many connectors are needed per joint?On a standard 23-5/8 in (600 mm) deep kitchen countertop, usetwoconnectors—one in the front third and one in the rear third. For island tops 35-7/16 in (900 mm) or deeper, usethreefasteners to distribute pressure evenly.
Can I connect worktops without a router?Creating a completely hidden joint with tension bolts like theArbeitsplattenverbinder M6x100mmrequires precise mortising (using a router or Forstner bit setup). Installers without routing gear must rely on surface-mounted aluminum joiner strips.
What is the advantage of gear-driven quick connectors?Right-angle gear mechanisms, like those on the"Quick" Arbeitsplattenverbinder, 150mm, turn the drive axis 90 degrees. Instead of turning a flat wrench in a cramped mortise, you drive the bolt effortlessly from above or below using a hex bit, drastically cutting installation time.
What size bit is required for the pocket holes?Standard countertop tension bolts use a1-3/8 in (35 mm)diameter borehole, identical to standard European cabinet hinge cup dimensions.
How deep should I route pocket holes?Hardware must sit centrally in the board core. On a standard 1-1/2 in (38 mm) countertop, route pockets approximately13/16 in (20 mm)deep. On 1-1/8 in (28 mm) tops, reduce depth to9/16 in to 19/32 in (14 mm to 15 mm)to avoid breaking through the surface laminate.
What is the best sealant for countertop joints?For laminate tops on particleboard core, use high-grade waterproof D3/D4 PVA wood glue. For solid wood or stone surfaces, use color-matched joint silicone or specialized joint adhesive squeezed tight under clamp pressure.