
Wohnwände
-
Wall Unit CLIF - Living Room Furniture Set - San Remo Oak / Anthracite GreyRegular price $529.99Unit price / perRegular priceSale price $529.99
-
Wall Unit VISTE - Living Room Furniture Set - Scandi / Truffle / White GlossRegular price $719.99Unit price / perRegular priceSale price $719.99

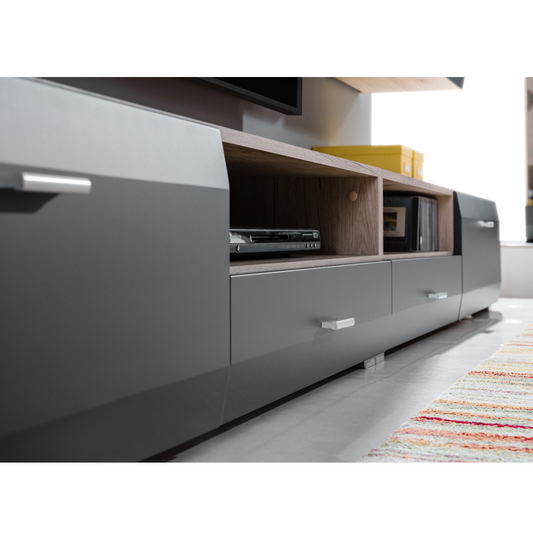

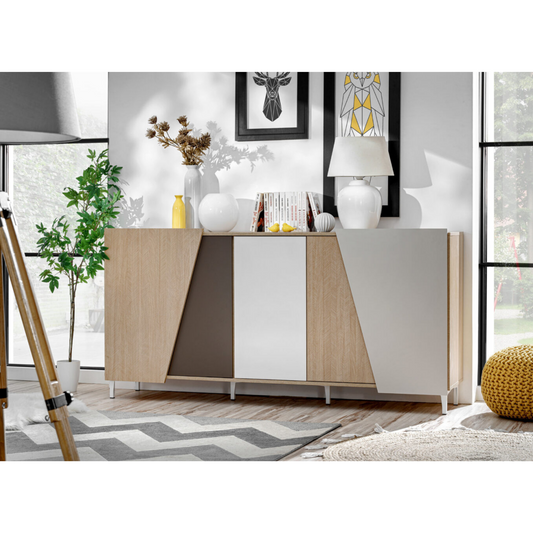
Wall unitsare multi-piece, modular furniture sets for the living area that typically consist of a TV stand, wall-mounted cabinets, standing display cabinets, and floating shelves, serving as a central media and storage solution. Unlike the massive wall units of past decades, modern entertainment centers feature an open arrangement that leaves wall space visible and keeps the integration of home electronics at the center of attention.
For DIYers and self-assemblers, this category offers a wide variety of configurations. The selection ranges from compact systems for small rooms to large-scale13 ft 1 in (400 cm) wall unitsfor spacious living rooms. This guide will walk you through technical specifications, material science, integrated hardware, and proper wall mounting for these furniture sets.
The Components of a Modular Wall Unit
Modernwall unitsconsist of various individual modules that can be positioned flexibly depending on your room layout. Dividing the individual cabinets allows you to functionally separate media electronics, decorations, and closed storage space.
- TV Stand (Lowboard):The base element of any media wall. It is characterized by a low profile height (typically13-3/4 in to 19-11/16 in (35 cm - 50 cm)) and high load capacity. It offers placement area for TV screens as well as open or closed compartments for receivers, gaming consoles, and cable management.
- Wall-Mounted Cabinets & Glass Cabinets:These elements make use of vertical room height. They are mounted to the wall using specialized heavy-duty cabinet hangers. Glass display cabinets feature inserts made of single-pane safety glass (ESG), which are frequently equipped with glass shelf lighting.
- Floor-Standing Display Cabinets & Highboards:Floor-grounded elements that provide an aesthetic counterweight to wall-mounted cabinets. They offerwall units with plenty of storage spacefor books, dinnerware, or binders.
- Floating Shelves (Wall Boards):Single or multi-piece shelves fixed to the wall using concealedshelf supportsor visible back panels. They serve as a connecting visual element between the cabinets.
Finishes, Surfaces, and Room Aesthetics
The choice of surface finish significantly impacts light reflection and the visual weight of the furniture in the room. The cabinet carcases are generally constructed from5/8 in (16 mm)thick, melamine-coatedparticle board, which offers excellent scratch resistance. Edges are sealed with ABS edge banding (typically1/64 in (0.5 mm)thick) for protection against moisture and impacts.
Matte and High-Gloss Solid Colors
Solid-color fronts dominatemodern wall unitsand minimalist interiors. For high-gloss or deep matte finishes,MDF(Medium-Density Fiberboard) is frequently used, as it enables a finer routing profile for handleless designs. Anyone searching forwhite wall unitswill find light-reflecting solutions to visually expand small spaces, such as theFUNNY PLUS Wall Unit - Living Room Set - White Matte / White Glossor the JUSTINE - Living Room Set - White Matte / White Gloss. A pure white, handleless look is also offered by the SWITCH Wall Unit - Living Room Set - White Matte / White Gloss.
Dark tones absorb light and create a more solid visual presence. Amatte black wall unitor high-gloss black models require thoughtful room lighting. TheMODERN Wall Unit - Living Room Set - Black Matte / Black Glossdemonstrates how dark surfaces create striking contrast against light-painted walls.
Wood Decors and Material Combinations
Wood reproductions bring visual warmth into the room without the high-maintenance care required for solid wood. Oak finishes featuring a tactile 3D wood grain (registered embossed) are particularly popular. A classicSan Remo Oak wall unitfeatures a light, slightly grayish wood tone, as seen in the CLIF Wall Unit - Living Room Set - San Remo Oak / Anthracite Gray.
High-contrast combinations of wood and solid colors add structure to large furniture pieces. Ablack and oak wall unitis a popular choice for industrial style interiors. Here, for instance, theSOLIDO Wall Unit - Living Room Set - Black Matte / Artisan Oakpairs cool black with warm, rustic Artisan Oak. Similar contrast is provided by the MANILA Wall Unit - Living Room Set - White Gloss / Artisan Oak for lighter interior concepts. If you are looking for specific gray tones, you will find them in theVERO - Living Room Set - Ash Gray / Coast Evoke Oak.
For lovers of 3D textures and extravagant fronts, the BLADE Wall Unit - Living Room Set - Black Matte / Sahara 3D offers routed surface textures that pop visually under targeted lighting.
Hardware Technology: The Inner Workings of Wall Units
The durability and operating comfort of a wall unit depend heavily on the integrated furniture hardware. Various standardized hardware systems are used during assembly.
Concealed Hinges
The doors of standing and hanging cabinets are attached to the carcase usingconcealed cup hinges. Standard models feature a cup drilling diameter of1-3/8 in (35 mm). Wall units generally utilize hinges with an opening angle ranging from95°to110°. Depending on door placement, overlay types are categorized as:
- Full Overlay:The door fully covers the front edge of the cabinet side panel.
- Half Overlay (Twin Overlay):Two doors share a single center partition (half coverage on each side).
- Inset:The door rests flush inside the cabinet side panels.
Many modern sets eliminate visible handles altogether usingpush-to-openhardware (also known as touch latches). A spring-loaded plunger pushes the door open upon light pressure applied to the front panel. Note: Push-to-open mechanisms mustnotbe combined with hinges featuring integrated dampening (soft-close), as the dampers will counteract the spring's push-open impulse.
Drawer Slides
TV stands are often equipped with drawers to store smaller items dust-free. Runner systems differ by design:
- Roller Slides:The standard choice for light loads. They run on nylon rollers and are usually designed as3/4 extension slides, leaving roughly25%of the drawer box inside the cabinet.
- Ball-Bearing Slides:Metal telescopic slides mounted to the sides of the drawer. They offer higher load capacities (often33 lbs - 55 lbs (15 kg - 25 kg)) and are commonly available asfull extension slides, allowing100%access to the drawer interior.
Connecting Fittings
For carcase construction,wooden dowels(typically5/16 in x 1-3/16 in (8 x 30 mm)) are used in combination withcam lock fasteners(Minifix). This system enables a sturdy, square assembly of particle board panels that can be non-destructively disassembled if necessary. Load transfer occurs via a threaded cam connecting bolt that grips into a pre-drilled hole and locks securely when the cam housing is turned.
Planning and Dimensions: Wall Units in Your Space
Before selecting models like theSAALA Wall Unit - Living Room Set - Monument Oak / White Glossor the compactMILA Wall Unit - Living Room Set - Artisan Oak / White Gloss, precise room planning is essential.
Proportions and TV Sizing
The TV stand serves as the visual anchor. As a rule of thumb for balanced proportions: The TV screen should take up no more thantwo-thirdsof the TV stand's total width. For a 65-inch television (approx.57 in (145 cm)wide), the TV stand should be at least78-3/4 in (200 cm)wide. For expansive wall surfaces and home theater setups, planning a13 ft 1 in (400 cm) wall unitis recommended, often achieved by lining up multiple TV stand modules side by side.
Floating Wall Units vs. Floor-Standing Elements
Floating (wall-hung) wall unitscreate a light, modern aesthetic and make floor cleaning effortless. All modules, including the TV stand, are wall-mounted in this configuration. This strictly requires solid masonry or concrete walls. If your wall composition is uncertain or consists of standard drywall construction, you should opt for floor-standing TV stands and display cabinets, such as those designed for the VISTE Wall Unit - Living Room Set - Scandi / Truffle / White Gloss.
DIY Assembly & Installation Guide
Assembling a multi-piece wall unit requires a systematic approach. Plan for approximately3 to 5 hoursfor assembly and wall mounting of a complete set.
Accurate alignment of wall-mounted cabinets is the backbone of the entire installation—a level reading off by even a single millimeter will visually compound all the way to the final wall shelf.
Required Tools
- Cordless drill/driver with matching bits (PZ2for chipboard screws,PH2for select hardware)
- Spirit level (at least31-1/2 in (80 cm)long for accurate transfer lines)
- Tape measure and pencil
- Rotary hammer (for concrete/brick) or standard power drill
- Rubber mallet (for wooden dowels)
- Screwdriver (Phillips) for fine-adjusting hinges
Step 1: Carcase Assembly
Assemble the carcases lying flat on the floor. Use the cardboard packaging as a protective underlayment to prevent scratches on decorative finishes (e.g., on theROSA Wall Unit - Living Room Set - Pearl White Matte / Coast Evoke Oak). Only apply wood glue to dowels if you never intend to disassemble the furniture piece. Back panels (typically1/8 in (3 mm)thick HDF boards) are attached using the included nails spaced roughly4 in to 6 in (10 cm - 15 cm)apart. They provide final structural rigidity and squareness to the carcase. Crucial step before nailing: measure across opposite corners with a tape measure—both diagonal measurements must match exactly.
Step 2: Wall Inspection and Anchor Selection
The standard wall anchors included are often suitable only for solid concrete or masonry. Test your wall with a trial drill hole:
- Concrete / Solid Brick:Gray or white drilling dust. Use high-quality nylon expansion anchors (typically5/16 in or 3/8 in (8 mm - 10 mm)).
- Autoclaved Aerated Concrete (AAC / Block):Coarse, white drilling dust. Use specialized aerated concrete anchors.
- Drywall / Gypsum Board:Fine white dust on the drill bit followed by a hollow cavity. You must use **hollow-wall metal anchors** or toggle bolts. Ideally, wall-mounted cabinets on drywall should be anchored directly into wood or steel wall studs.
Step 3: Mounting and Leveling
Mount the hanging rails level on the wall. Hang the cabinets onto the rails. The cabinet suspension brackets inside the carcases feature two adjustment screws: One for height adjustment (leveling) and one for depth adjustment (pulling the cabinet flush against the wall).
Step 4: Door Adjustment (3D Fine Tuning)
Once all carcases are mounted and level, install the front doors. Uneven door gaps (reveal gaps) can be corrected directly at thehinge cup:
- Depth Adjustment:Loosening the rear screw on the hinge arm allows you to move the door closer to or further from the cabinet carcase (regulates the gap between door and cabinet).
- Height Adjustment:Located on the mounting plate (the part screwed to the carcase side). Loosen the screws slightly to shift the door vertically.
- Side-to-Side Adjustment (Reveal):The front screw on the hinge arm tilts the door left or right. This ensures the gap between two adjacent doors runs perfectly parallel (recommended gap:1/16 in to 1/8 in (2 mm - 3 mm)).
Lighting and Cable Management
Wall units with integrated lightingcreate inviting ambient highlights in the evening. Most systems utilize LED clip lights pushed onto the back edge of glass shelves. During assembly, ensure the thin LED wires are routed through the designated cutouts behind the back panel before nailing it in place. Position the LED power transformer so it remains accessible for maintenance, ideally behind the TV stand or on top of a wall cabinet.
For clean media cable management, use the pre-drilled cable pass-through grommets in the TV stand top panel. If no pass-throughs exist from the factory, you can drill them into the top panel or back wall using a hole saw (typical diameter2-3/8 in (60 mm)) and cover them with a plastic desk grommet sleeve.
FAQ – Frequently Asked Questions About Wall Unit Assembly
How much space should I leave between the TV stand and wall cabinets?Vertical spacing depends primarily on the size of your TV screen. Leave at least6 in to 8 in (15 cm - 20 cm)of clearance between the top edge of the television and the bottom edge of hanging cabinets so the screen doesn't look cramped and heat can dissipate properly.
Can I reconfigure the layout of modular wall unit elements?Yes, with modular systems like theSleek Modern Wall Unit, the elements are structurally independent. You can arrange wall cabinets to the left, right, or asynchronously above the TV stand. Exceptions apply to entertainment centers with full single-panel backboards.
What does "melamine coating" mean on particle board?Melamine resin is a durable thermosetting plastic. A melamine-coated particle board is liquid-repellent, scratch-resistant, and fade-proof. The decorative finish (e.g., wood grain or solid color) is protected beneath this hard resin layer.
How do I clean high-gloss cabinet fronts properly?Avoid using microfiber cloths on high-gloss MDF (such as glossywhite wall units), as micro-abrasives in the cloth can leave fine swirl scratches on the surface. Instead, use a soft, slightly damp cotton cloth and mild soapy water if needed. Do not use abrasive cleaners.
My drawers aren't closing flush. What causes this?Check whether the TV stand carcase is perfectly level. On uneven floors, cabinet frames can twist slightly, causing drawer slides to run out of parallel alignment. Place leveling shims under the cabinet legs/feet to align the unit.
How much weight can wall-mounted cabinets hold?Weight capacity depends on wall construction and cabinet dimensions. When properly installed into solid concrete or masonry walls, standard wall cabinets support approximately33 lbs to 55 lbs (15 kg - 25 kg). Load wall cabinets primarily with lighter items (glassware, decor) and store heavy items (books, binders) in floor-standing lowboards or highboards.
Related Categories
If you are seeking solid wood furniture that naturally regulates indoor humidity instead of foil-laminated particle board, explore corresponding models in ourSolid Wood Wall Unitscollection.