
Furniture USB Charging Port
-
USB Charger + Power SupplyRegular price From $32.59Unit price / perRegular priceSale price From $32.59

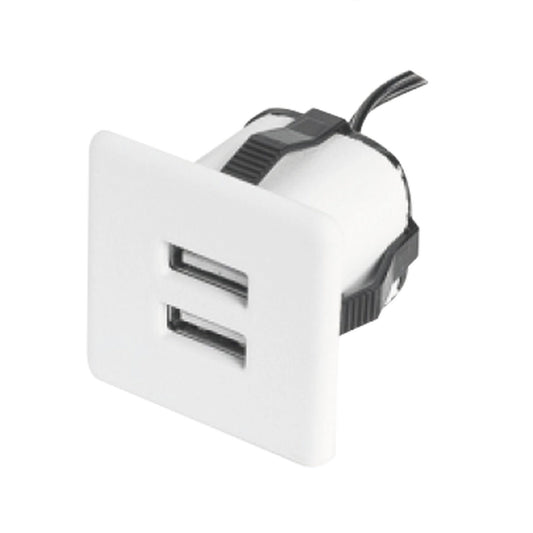
A furniture USB charging port is a compact power source integrated into wood or composite panels, powered by a concealed driver to charge mobile devices directly on the surface of your furniture.
When building custom furniture or upgrading existing pieces, managing cords and power cables is a common challenge. Traditional power strips look cluttered and take up valuable space. Installing afurniture USB charging portor compact power outlet directly into the cabinet or desk frame solves this problem seamlessly. Built-in power units act as the invisible nervous system of modern furniture—delivering power right where it is needed without spoiling the design with exposed cords.
In this guide, DIYers and cabinetmakers will learn how to properly plan and install afurniture USB charging portwith professional precision—from choosing the right drill bit to positioning, wiring, and power supply safety.
Why Install a Furniture USB Charging Port?
Integrating charging technology into custom cabinetry and tables changes how a space functions. Instead of stretching charging cables across the room or hunting behind heavy furniture for wall outlets, the furniture piece itself becomes a dedicated power source. This is especially useful for freestanding pieces and open-concept room designs.
The Living Room: TV Consoles and Sideboards
Living areas host plenty of personal electronics. Sideboards and credenzas frequently serve as drop zones for smartphones, tablets, and e-readers. Integrating anembedded USB charging portcreates a clean, permanent charging station where cords disappear behind the back panel. When adding a power strip or USB module to a credenza retroactively, ensure the main power cord is long enough to run neatly along the baseboard to the wall outlet.
The Bedroom: A Clutter-Free Nightstand
Nightstands offer limited surface area. A bulky wall adapter plugged in right next to the bed ruins the clean aesthetic and gets in the way. Installing a flush-mountedfurniture USB charging porton the top panel or side cabinet wall keeps the main nightstand top completely free for lamps and books, allowing short charging cables to keep bedside clutter to a minimum.
The Home Office: Desks and Workstations
Reliable power is critical at work. A height-adjustable standing desk with outlets requires smart cable routing because the desktop is constantly in motion. Here, therecessed USB power supplymodule must be securely mounted under the work surface. The power cord connecting the supply to the wall outlet needs enough slack to accommodate a typical height range of25-1/2 in to 49-1/4 in (65 cm - 125 cm)without strain. Installing adesk USB chargerdirectly into the desktop prevents mouse, keyboard, or phone cables from dangling over the edge.
Technical Basics: What to Know Before Installation
Before picking up the drill, it helps to understand the technical setup. A furniture charging system usually consists of more than just the visible port; it includes a concealed power driver mounted inside the cabinet body.
Power Supply and Drivers
Connecting USB ports directly to standard230 Vhousehold power without a transformer is impossible. USB devices run on low-voltage direct current (DC) of5 V(or9 V/12 Vfor fast-charging standards). Therefore, installing afurniture USB charging portrequires a dedicated driver/transformer.
With integrated sets like theUSB Charger + Power Supply, the power driver is hidden inside the furniture unit. Thisembedded power supply unitconverts high-voltage AC current into safe DC power for smartphones. When planning your layout, make sure to leave adequate ventilation around the power pack to dissipate operational heat.
Installation Depth and Material Thickness
Furniture is typically built from particle board,MDF(Medium-Density Fiberboard), or solid hardwood. Standard panel thicknesses in cabinetmaking are5/8 in (16 mm),3/4 in (19 mm), or7/8 in (22 mm). Flush-mount USB outlets are designed to fit securely into these standard panel profiles.
Installation depth refers to how far the socket housing extends into the cabinet cavity. If you are mounting afurniture USB charging portinto a desktop directly above a mobile pedestal or drawer stack, verify that the housing under the top does not interfere with top drawer operation. Allow at least1-9/16 in to 2-3/8 in (40 mm - 60 mm)of clearance beneath the panel.
In-Cabinet Cable Management
A cleanfurniture integrationproject requires smart cable routing. The cable runs from the visible USB port to the hidden transformer. From there, another power cord connects to the nearest wall outlet. Utilize void spaces behind cabinet back panels or attach slim plastic wire channels under desks. Inside cabinet boxes, secure loose wires using cable clips or nail-in clamps along the interior walls to keep them from catching on stored items.
Placement Planning: Ergonomics and Interior Aesthetics
Deciding where to place afurniture USB charging portdepends on how the furniture piece is used. There are a few approaches to integrating the hardware seamlessly.
Flush-Mounted Installation (Visible)
The most popular method is mounting the port on the top horizontal surface of a desk or credenza. A clean hole is drilled through the surface, and the outlet is inserted from above. The outer lip of the housing sits flush or near-flush against the wood, neatly covering the cut edge. This provides quick, convenient access for daily charging.
Concealed Installation (Side-Mounted or Interior)
To keep top surfaces completely clear, opt for hidden placement. USB ports can be built into vertical side panels (gables) or inside open shelving compartments. Creating a dedicated charging cubby lets devices sit out of sight while powering up.
Special Case: In-Drawer Outlets
A popular modern solution is placingoutlets inside drawers. This allows phones and tablets to charge out of view while keeping nightstands and desks clean. However, it requires a bit more craftsmanship. Because drawers move on drawer slides (full or partial extension), the power cable behind the drawer box must flex smoothly. Use a flexible drag chain or expandable cable conduit so the wire rolls out when opened and tucks away without getting pinched when closed. In this setup, theembedded USB power supplyis mounted to the rear interior wall of the cabinet frame, sending only low-voltage wire into the moving drawer box.
Step-by-Step Guide: How to Install a Furniture USB Charging Port
Adding afurniture USB charging portas a retrofit project takes about30 to 60 minutesper port with standard DIY tools. Follow these steps for a clean install.
1. Required Tools and Materials
To install a complete kit like theUSB Charger + Power Supply, gather the following:
- Cordless drill or drill press
- Hole saw or Forstner bit matching your port diameter (typically1-3/8 in (35 mm),1-9/16 in (40 mm), or2-3/8 in (60 mm))
- Standard wood drill bit (1/8 in (3 mm)or3/16 in (5 mm)) for pilot holes
- Tape measure and pencil
- Painter's tape (masking tape)
- Screwdriver (usually PZ2 or TX20 drive for mounting screws)
- Half-round file or medium sandpaper
2. Measuring and Marking
Mark the exact location for the USB socket. Make sure you are not drilling directly over an interior vertical divider panel. Check under the board to ensure sufficient clearance for the socket depth and output wire. Apply painter's tape over the target spot. The tape serves two purposes: it makes pencil marks easy to see and prevents fragile laminate or veneer from chipping when the bit bites down. Mark the exact center point of the cut.
3. Drilling the Port Opening
Place the center point of your Forstner bit or hole saw precisely on the mark.
- Drill at medium speed with steady, gentle downward pressure.
- Hold the drill strictly perpendicular (90°) to the surface. A crooked hole will prevent the port collar from sitting flat against the wood.
- For clean through-holes: Drill from the top face until the center pilot point barely breaks through the underside. Stop drilling, flip the panel over, and finish the hole from the back side using the small pilot hole as your guide. This eliminates blowout on both faces.
4. Smoothing Edges and Fitting the Module
Peel off the painter's tape and lightly sand the inside edge of the hole if needed. Thread the USB module cable down through the hole from the top. Press the charging port into place. Many flush-mount units feature flexible side retention tabs that press tight against the borehole walls, while others secure from below using a threaded lock ring.
5. Mounting the Power Driver and Wiring
Choose a hidden spot inside the cabinet body for theembedded USB power supply. Pick a spot that is out of view but remains accessible if service is ever needed—such as behind a drawer box or near the top of an interior shelf. Fasten the power supply housing using short wood screws (e.g.,#6 x 5/8 in (3.5 x 16 mm)). Always ensure screws are shorter than your panel thickness to avoid puncturing the outer finish. Connect the output cord from the USB port to the corresponding connector on thefurniture power supply. Finally, run the main power cable out through a notch or slot in the back panel to the wall outlet.
Alternative Options: Wireless Induction vs. USB Cords
In addition to hardwired USB connections, wireless Qi charging is another popular choice. Installing afurniture induction chargerinvolves a slightly different technique compared to standardfurniture USB charging portinstallation.
With wireless induction pads (Qi standard), smartphones charge simply by laying flat on the designated surface. Installation can be done in two ways:
- Surface Mount (Visible):Similar to USB ports, a hole is drilled completely through the panel, and the circular charging pad is set flush into the surface.
- Sub-Surface Mount (Hidden Under-Counter):Using a plunge router, the underside of the panel is pocket-routed out from below, leaving a thin veneer top layer of roughly1/16 in to 1/8 in (2 mm - 3 mm). The induction module is mounted inside this cavity. Nothing is visible from the top, keeping the wood finish unbroken while magnetic charging fields pass through the thin panel. However, this method requires precision woodworking tools (a router) and experience, as routing slightly too deep can ruin the workpiece.
For most DIY furniture builders, installing a classicfurniture USB charging portwith a complete kit like theUSB Charger + Power Supplyis much more forgiving and delivers reliable, high-speed daily charging.
Electrical Safety Guidelines for Built-In Furniture Chargers
Combining electricity and woodwork requires attention to basic safety. Even though USB outputs run on safe low voltage, the primary side of theembedded power supply unitconnects to standard230 Vmains power.
- Heat Dissipation:Power drivers should never be completely sealed in tight, unventilated compartments or surrounded directly by insulation. Always leave a few inches of air space around the driver housing.
- Strain Relief:Ensure that low-voltage lines and power cords connected to the driver are not pulled tight or under tension. Fasten wire runs securely to the interior cabinet walls with wire clips.
- Moisture Protection:A standardfurniture USB charging portproject is ideal for living rooms, bedrooms, and home offices. Damp locations like bathrooms or kitchen countertops near sinks demand specialized IP-rated splash-proof fixtures. Standard furniture USB ports are not intended for wet areas.
Frequently Asked Questions (FAQ)
What drill bit size do I need for an embedded USB port?That depends on your specific hardware model. Most circular flush-mount USB ports require a bore diameter between1-3/8 in (35 mm)and2-3/8 in (60 mm). A sharp Forstner bit cuts the cleanest holes in solid wood and particle board. Always measure the body diameter with calipers before drilling.
Can I install a USB charger into any furniture piece?Generally yes, as long as the wood panel is thick enough to support the housing (at least1/2 in (12 mm)recommended) and there is sufficient clearance inside for the socket depth andmatching power driver. Glass or thin sheet-metal furniture is much harder to modify without specialized equipment.
What is the difference between an embedded furniture USB port and a standard power strip?A power strip rests on top of or mounts onto furniture surfaces, taking up footprint and looking bulky. An embeddedfurniture USB charging portdrops directly into the panel for a seamless, flush finish while concealing thepower driver and wiringhidden within the cabinet body.
How long can the cable be between the USB port and the power supply?Low-voltage (5 V) lines should not be extended beyond their factory length. Longer wires increase electrical resistance, reducing charging performance at the device end. Factory cables included with products like theUSB Charger + Power Supply(typically39 in to 78 in (100 cm - 200 cm)) are engineered for optimal performance and should not be cut or spliced.
Can you add outlets inside existing drawers?Yes. However, you must ensure the cable trailing behind the drawer box has enough slack and guided movement to open and close smoothly without getting pinched or frayed by full-extension drawer slides.
Related Categories for Your Custom Furniture Project
If you're upgrading your cabinetry or desk builds, check out these complementary hardware lines. Explore low-voltage lighting solutions that integrate smoothly with furniture power systems underLED Lamps with USBand our full range ofLED Strip Lights. Secure office pedestals withFurniture Locks, or equip heavy file drawers using heavy-duty drawer slides like ourDrawer Slides 24 in (600 mm). For protecting finished furniture pieces during shipping, explore ourPackaging & Protective Filmrange.